Ktadd's Personal Website
  • Home
  • OWB Hotlist
  • Digital Signals
  • Entertainment
  • Video/Audio Sites
  • Ktadd's Software Page
  • Amiga Hotlist
  • Amiga Development
  • ffmpeg Cheat Sheet
  • World Clock
  • Amiga NG Blog

Using MediaVault & mediavault_script (OS4)

12/1/2024

3 Comments

 
(Open pictures in new page for larger view)
Picture
About MediaVault and mediavault script.

MediaVault v1.5.1 & mediavault_script v1.6

Well, it's been a few months since my last blog entry, but I finally found the motivation to fulfill the promise to do a review of MediaVault.  So, in this entry, I'll provide an in-depth review of MediaVault v1.5.1 written by George Sokianos, who has made many great contributions to the AmigaOS4 community. I'll also cover using it with mediavault script version 1.6, which I wrote to allow choosing an audio player or saving the stream via a requester.
Download MediaVault from OS4Depot
Download mediavault_script from OS4Depot

​What is MediaVault Anyway?

​MediaVault v1.5.1 is an AmigaOS4 program that allows you to search for and play streaming radio stations as well as podcasts.  It also allows you to save your favorites and, in the case of Podcasts, mark streams to listen to at a later date.  With the help of the mediavault script, portions of radio station streams and full podcasts can be saved to a file on hard disc for later playback on your Amiga or other devices.  More on mediavault script later. First, let's take a detailed look at MediaVault.

​Understanding the MediaVault Interface

Picture
Three sections of MediaVault's interface.
As can be seen, MediaVaults interface is divided into three main sections. On the left is a list which is broken into Radio and Podcast sections. Under each of these are subsections to help find and store your favorite streams.  The middle section contains controls to set search parameters and list "Discovered" radio or podcast streams.  The section on the right contains controls to start playing the streams, save links to the "Favourite" (Star+) and "Listen Later" (Book+) lists. This section also displays information about the selected stream currently playing.  The interface is very clean and easy to use. Hats off to George for the nice design.

​Finding and Playing Radio Streams

Picture
Found and playing a local radio station with ffplay.
When MediaVault is started, the "Radio" list item is selected.  In the middle section of the GUI are controls to filter by Name, Genre, Country and Language.  Once these are fields are set, click the "Discover" button to find matching radio stations.  As seen above, I entered the station frequency as name and set Country to U.S. and Language to English. Once I clicked Discover it found the local radio station I was looking for.  I then highlighted the station I wanted and click the "Play" button on the right to start streaming the station with ffplay.  On the right side of the interface, information about the station is displayed, along with a logo for that station, if the station supplies one.
Picture
Playing a stream from the "popular" list with AmigaAmp3.
Two other ways to find radio streams include clicking on the "Popular" and "Trending" list entries in the Radio tree. These show the most listened to or trending stations over the last 24 hours.  Once you find a radio stream you like, click on the "Star" with the plus, to add the station to the "Favourite" list. The plus on the star will turn to a minus sign. Clicking the minus Star removes the selected entry from the "Favourite" list. 

 Let's Explore Podcasts

Picture
Found the "Amiga Ireland Podcast".
Clicking on "Podcast" in the tree list takes you to the podcast search page. As seen above, I found the "Amiga Ireland Podcast" link. Clicking on the link brings up links to all the individual episodes to listen to, as shown below.

Note: Podcasts may not be found if the time on  your system is out of sync. Try syncing with an online NTP server to update it. 
Picture
Playing the October 19, 2021 episode with Emotion.
Clicking a link, then the "Play" button starts the podcast playing.  As with the Radio section, the information about the podcast is displayed in the right section of the interface, along with a logo, if available. The "Star" is still available to add podcast links to the "Favourite" list. Note that this does not save the individual episode link, but will only save the top-level link, which can then be clicked on to see the full episode list.  This is where the "Book" button comes into play. If you highlight a specific podcast episode, then click the "Book" button, the individual episode link will be placed in the "Listen Later" tree list.  As with "Favourites", selecting an episode and clicking when the "Book" button shows the minus sign, removes the entry.
Picture
Showing Trending English language, Comedy podcasts.
The last thing to cover in the "Podcast" section is the "Trending" entry.  Selecting this shows a page that allows searching trending podcast by Genre and Language. As can be seen, I have found the "Funny or Die Podcasts" by searching "Comedy" and "English" language.   Clicking this entry will bring up the list of individual episodes.

Let's Talk Scripts

So, what's all the talk about scripts at the beginning of this blog? We'll by default MediaVault will use AmigaAmp3 to play the streams, which works well, but what if you want to use a different player for some reason. For example, AmigaAmp3 takes up a lot of CPU time on an A1222+.  This is where scripts come into play.  If you look in the "scripts" draw, in the MediaVault directory, you will see a file named "start_player.sample".  If you look at this script in an editor, you will see that you can comment and uncomment some lines in the script to use either "ffplay" or "Emotion" to play streams. If you rename this script to "start_player", MediaVault will use this script and use the uncommented section to choose the program to use for playing the stream.  It's nice to have this flexibility but it's painful to change between different players.  What if there were an easy way to pick a player on the fly, like from a requester?  ​

MediaVault Script v1.6

Hey, that's what I wanted to do, so I wrote a script. Then I decided I wanted to be able to save a Podcast stream so I could listen to it on other devices. So, I added that capability too.

 Installing MediaVault Script v1.6

First download the mediavault_script.lha file from OS4Depot. (See link at the top of this blog entry.). Unpack the lha file and rename the "start_player_v1.6" file to "start_player". Then move the "start_player" script file into the "MediaVault/scripts" directory.  Make sure to read the readme file and set the "User Settings" within the script as desired.  For each feature to work, the required program must be installed and run at least one time. If a required program is missing an error requester will be displayed.  

Using MediaVault Script

Picture
Choose a player or save stream from a requester.
Once the install is complete, select a Radio or Podcast stream and click "Play".  The requester shown in the above picture will be displayed, allowing you to select the desired player or save format.  If you don't select anything the requester will timeout in 5 seconds (default) and AmigaAmp3 will be used.  The "Save to mp3" selection will use ffmpeg to convert the stream to mp3 audio and save it as a .mp3 file.  The "Save Copy" selection will use ffmpeg to copy the stream in its original format and save it in an “mka” file format.  This will be faster but may not be as compatible with other devices as the “mp3” format. 
Picture
Picking a location and filename when saving a podcast.
If the a "Save" selection is chosen, a save requester will appear so the filename and location can be changed. If not changed the defaults of "Ram:" and "Saved_Stream" will be used.  The appropriate file extension will be added. If the requesters "Cancel" button is selected, the script exits without saving.
Picture
Saving a podcast stream to a file.
If "OK" is selected, an ffmpeg console window is opened to monitor the download progress.  A "MediaVault Save" requester is also open. Clicking on "Done", while the download in progress will stop the stream download and close the file so it can be played. This allows for capturing portions of radio streams or part of a podcast.  To download full podcast episodes, let the download complete (the “MediaVault Downloading...” console window will close) then click "Done" on the Save requester to close it.

MediaVault Script User Settings

The MediaVault Script has a "User Settings" section which allows the user to set the behavior of the script.  Note: Do not change anything outside of the "User Settings" section unless you are sure of what you are doing.  The following items can be changed.
Picture
Set the default play action.
This sets the default action when the requester is disabled. No requester will be shown. This is ignored if the requester is enabled.
Picture
ffplay related settings.
Set ffp_width to the number of pixels used for the ffplay window width.
Set ffp_height to the number of pixels used for the ffplay window height.
Set "dispmode" to choose the type of video display that ffplay will use. 
Note selection 1 uses a lot of CPU time, so only use for faster systems.
Set to selection 2 for slower systems. 
Picture
Set requester parameters.
​Set "show_player_req" to 1 to override the default "player" selection and display a requester. Set to 0 to not show a requester.
Set req_time to the number of seconds the requester will be shown before it defaults to AmgiaAmp3 and closes.
Set default_volume to the location for saving streams.  (Volume:[path])
Set default_filename to the name of the file to save. The proper extension will be automatically appended.

​How does it work on the A1222 Plus?

Picture
MediaVault playing a radio stream with Emotion on the A1222 Plus.
MediaVault and MediaVault Script works well on the A1222 Plus with some exceptions.  For best performance use Emotion as the stream player. This works very well and only uses about 20% of the CPU.  Playing streams with AmigaAmp3 will also work fine, but it will use about 75% of the CPU.  The current version of ffplay (v6.1) does not work with the A1222 Plus so it cannot be used for playing streams.  The same goes for the current version of ffmpeg (v6.1), so saving streams is not yet possible.  I plan to look into other options for saving the streams on the A1222 Plus, so maybe someday it will be possible. No promises though. ​

A Final Word

​MediaVault is a standout program for AmigaOS4, and its capabilities are expanded with MediaVault Script. The pair makes a quite nice streaming Radio and Podcast solution.

​If you like and use MediaVault, please send Goerge Sokianos a donation by buying him a coffee.
Buy George Sokianos a coffee
Thanks to Maijestro, a video of MediaVault using mediavault script is available. (Subscribe to his channel.)
View MediaVault Video

I hope you have enjoyed this blog entry. Comments are welcome and suggestions on what you would like to hear about next are always welcome.​

3 Comments

10-Watt Audio System Inside My A1222 Plus

8/5/2024

1 Comment

 
Last entry I covered audio players on the A1222 Plus, so it only seems fitting that I make a quick detour back to the hardware side to cover how I outfitted my A1222 Plus with an internal 10-Watt amplifier and speakers. 
Keeping in mind my goal of creating a truly portable system, I had to find a way to fit and power an amplifier, with decent sounding speakers, all inside the small case.  It took a bit of research with trial and error to find the right components, but in the end, I'm happy with the sound quality and packaging.  This blog describes how I was able to accomplish this task.

PictureA1222 Plus with 10-Watt Amplifier and speakers inside.
(Open pictures in new page for larger view)


Where to Start

The first thing to do was to find out what amplifiers are available. So, off to Google and Amazon to do some research.  I needed to find something small enough to fit inside the case, run off the internal power supply, and have enough wattage to produce decent sound. I'm not talking high fidelity but something that I could listen to without cringing.  To my surprise, I found a whole host of mini amplifier boards with various voltage requirements and various wattages. After reading multiple reviews and specification sheets of various amplifier chips, I settled on the HiLetGo PAM8610 Mini Stereo Amplifier.  It was small enough to fit perfectly in my case, where I needed to put it. It produces 10-watts using a 12V supply and had a volume control that fit perfectly though an existing hole in the back of my case. The hole was there to allow use of an external power supply as an option. More information on the amplifier can be found here. 
HiLetGo PAM8610 Amp on Amazon
Picture
Amplifier Information.
Picture
Amplifier Installed.
As the name implies, it's based on the PAM8610 DC Class D amplifier chip. This is an older chip but there seem to be a lot of mini amp boards built around it. Best of all it only cost $7.50 US .  Specifications for the chip are as follows:

Class D stereo amplifier
Power Output: 10W per channel into 8ohms 
Frequency Response: 20Hz to 50KHz
Recommended power supply voltage: 12V
PCB board size: (40 * 40) mm
Power Interface: 5.5mm socket
Audio Interface: 3.5mm
1% THD at 5 Watts, Max 10% THD at 10 Watts

Connecting it all up

 Ok, so I've settled on an amplifier, now how am I going to connect it all up?  Well, the power supply has a 12V line available and the audio output from the A1222 Plus motherboard is a 3.5mm connector. I also needed wire to connect the speakers. More about speakers later.  So…back to Amazon to do some searching.  
Picture
CRJ 4-Pin Male Molex to 12V DC 5.5mm adapter cable
Picture
3.5mm to 3.5mm right angle stereo audio cable
Picture
Two conductor, twisted pair, shielded wire
​To my surprise, I found a CRJ 4-Pin Male Molex to 12V DC 5.5mm, 1mm long adapter cable which worked perfectly to make a very clean connection.
Molex to 12V DC Adapter on Amazon
​Of course, 3.5mm audio cables are easily found, so I used this 1 foot one with a right-angle connector on one end.  I was able to run this cable from the outside of the case to the inside through a hole that was intended for a second speed switch for a second fan that the case supports. ​
3.5mm Audio Cable on Amazon
​​Two conductor, twisted pair, shielded wire, in small quantities, for connecting the speakers, was much harder to find. With persistence I managed to find the following wire, which works well and keeps out extraneous noise generated from the motherboard.
Twisted Pair Shielded Wire on Amazon

Speakers - The Final Challange

Now that I have the amplifier, cables and wires, the one last component I needed was speakers.  Speakers play a major role in the sound quality, and it was quite a challenge to find speakers that would fit inside the case and still sound reasonably good.  After getting the amplifier mounted and all wired, I tried the system out with some old 3" car stereo speakers I had out in the garage. After hooking them up, I fired up the audio program, SongPlayer (see previous blog entry), and tweaked the treble and bass controls. To my surprise, it sounded good. There is room on one side of the case where a second fan could be installed and a little room on the other side of the case next to the power supply where I could mount speakers.  Unfortunately, these speakers wouldn't fit in the case.  What to do?   
Picture
Top left, Vizio 24" TV speaker. Below, small project speaker. Right, 3" car stereo speaker.
It was at this moment that I remembered I had an old broken flat screen TV in my garage, so I broke it open and ripped the speakers out of it. They were long and skinny and fit in the case quite nicely. They were only 3-watt speakers which sounded about as good as you would expect from a flat screen TV (not great). They didn't produce much bass and, as expected, distorted if I cranked the volume to high.  So, I buttoned things back up and began a new search on Amazon for speakers.  I found some project speakers, that could handle 10 Watts, but they didn't provide any more bass than the TV speakers, so the search continued until…..
Picture
10-watt, 8 ohm speaker front
Picture
10-watt, 8 ohm speaker rear
​Eventually, I was able to find these 3-inch, 10-Watt speakers that were no more than 1.77 inches deep. The speakers are rated at 90dB sensitivity with a frequency range of 108Hz to 20kHz.  I thought I could squeeze these in, so I ordered them.
10 Watt 8 Ohm Speakers on Amazon
Picture
Far side speaker in second fan slot. Near side speaker in space next to power supply.
Once received, I managed to get them mounted and wired in. They fit and actually sound pretty good with a decent amount of bass, especially when I increase the bass setting with SongPlayer. Not booming but there and balanced with the mid-range and highs. I was finally happy with the results. One last finishing touch was to find a knob for the volume control. After a bit of effort, I am very satisfied with the results and am happy with the sound. It's not high fidelity but as good as a decent pair of smaller external speakers. I was able to accomplish my goal of having a fully functional system, in a portable size case, that only requires me to plug in one power cord to operate.  Below are some pictures of the final product. 
(Open pictures in new page for larger view)​
​
Picture
Final build. Top View.
Picture
Right side speaker.
Picture
Left side speaker.
Picture
Rear view showing volume knob in upper left and 3.5mm cable going from sound output jack to inside the case. Also shown is the IOGear AR LAN to WiFi adapter to allow true portability.

What's Next

​So, now that I have some nice built-in sound for my A1222 Plus, it's time to put it to some expanded use. Next blog I'll take a detailed look at "MediaVault". A streaming player by Georgios Sokianos.   I'll review using it with a script I wrote to expand its functionality and take a look at how well, or not, it works with the A1222 Plus. 
​
As always, your comments are welcome.

1 Comment

Audio Players on the A1222 Plus

7/7/2024

2 Comments

 
OK, enough about setting up the A1222 Plus, let's get into running applications. The first thing I did was download AmigaAmp3, my favorite music player, and load up some of my favorite songs in mp3 format. AmigaAmp3 on the A1222 Plus can play music file fine but it uses a lot of CPU time and, with default settings, causes the GUI response to be very slow and almost unusable. My first thought was what can I change in the settings to improve the performance. I was able to tweak some setting (more on that later) to make it usable, but it still used about 70% of the CPU time. What to do?  Try out other music players of course. So, here starts the journey.  Off to OS4Depot.net to download and try out a multitude of music players. TuneNet is shipped with the Enhancer package that is included with the A1222 Plus, so of course I tried that out as well. Below you will find the list of players I tried with pictures of their interfaces configured for minimal display space. 

(Open images in new page for a larger view.)
Picture
RNOTunes v1.1
Picture
DAPlayer v1.4 (Song info enabled)
Picture
AmigaAmp3 v3.4 (SmartAmp Skin)
Picture
SongPlayer v1.64
Picture
TuneNet v2.18 (Skin enabled.)
What I found is that there are a multitude of very nice audio players that work with the A1222 Plus. This is not intended to be a full review of each player as they have so many features it would simply take too much time and space. Instead, I want to focus on how well each one works on the A1222 Plus and point out unique features of each one that distinguishes it from the others. I also use these features as the bases for why I would choose one over the others for a given task. Note that I only tested with mp3 music files and did not do any streaming of files over the web, except with TuneNet. Maybe I'll do a blog another time. Leave a comment if you would like me too.

​AmigaAmp3 v3.4 with SmartAMP Skin

Picture
AmigaAmp3 with Equalizer and Playlist windows.
​This is my favorite player on my X1000 and is still the one I use by default. It has built in support for mp2, mp3. aiff, wav 8vsx, flac, ogg m4a, mod, s3m, xm formats. In addition, it also supports TuneNet pluggins, making it one of the most versatile in terms of supported formats. It also supports streaming from the internet. Unfortunately, on the A1222 Plus, it takes up ~70% of the CPU time and ~80% if you turn on the equalizer feature. The 10 band equalizer, along with the many available skins make AmigaAmp3 the most flexible in terms of customizing the sound and appearance. To make it usable on the A1222 Plus I had to change the following setting in preferences:

Program Tab:

"Scan Method" = "No Scan". (Guru will appear loading multiple files if not off.)

Visualization Tab:
"Mode" = "Off" (Just not enough CPU power for visualations while playing.)

System Tab / Task Priorities:  (To make Workbench usable while playing.)
"Main" = "1"
"Playback = "1"

With these setting, audio can be played with the interface remaining responsive, but you can't run any other programs that need a lot of CPU time.

​TuneNet v2.18 (28.6.2022)

Picture
TuneNet AmiDoc Interface
Picture
TuneNet main interface with no skin.
So, let's move on to TuneNet since it is included in the Enhancer package shipped with the A1222 Plus. TuneNet is probably the most vestal and feature rich audio players available for OS4. It not only supports plugins that allow you to play most any format (to many to list here) but also has good support for streaming from the internet. It is the only player I tried that has the ability to scan for internet stations and the ability to broadcast as well, although I have never tried the broadcast feature. Of all players, it has the best streaming support.  The main GUI could be streamlined but is usable. On my X1000 I just use the AmiDoc GUI but that eats up too much CPU time on the A1222 Plus for my taste. See below.

It runs pretty well on the A1222 Plus and only uses about 8% CPU resources when just using the default GUI. Unfortunately it raised to ~22% CPU usage when using the "SkinFX Display" or "AmiDoc Display" modes. When using both at the same time the CPU usage goes to ~32%. Note that even at this usage, the systems GUI is usable and other programs can be run just fine. This is with the task priorities set to 0 for the GUI and 4 for the Player.  

DAPlayer v1.14 ​

Picture
DAPlayer with song info, playlist and album art displayed.
Now let's try out some of the lesser known but still quite good audio players. 
I'll start with DAPlayer. It's one that I have tried briefly on my X1000 and at first glance it did fine playing mp3 files, but I didn't see anything special about it. However, when trying on the A1222 Plus, I discovered it has some nice features that can be very useful. Not only can it play a variety of formats but by setting environment variables and using the appropriate libraries it can play directly from audio CD's, play midi files, and stream files from the internet. In addition, you can also set a volume level which is used before playing each file to equalize the volume between different files. Unfortunately, the documentation is a bit lacking, so it's not always clear how to setup some of these features. Note that you will need to download some libraries, including id3tag, mpega, codesets, and digibooster3, to get full functionality. This is not mentioned in the documentation, but is noted in the download readme file, so make sure you download that as well. DAPlayer supports the following formats: mp3, aiff, wav, flac, ogg, CDDA raw data, midi, dbm, mod, s3m and  xm.  It will also support streaming from the internet with AMISSL is installed.


DAPlayer works well on the A1222 Plus and used about 8-10% cpu time when playing mp3 files. I don't have a CD in my A1222 Plus, so I wasn't able to test that feature. But I have tried in on my X1000 and it seems to work well.   

​RNOTunes v1.1

Picture
RNOTunes with playlist, song info and lyrics.
RNOTunes is a Hollywood based program which uses MUIRoyale, so it's interface looks like a standard OS4 program that uses MUI. The only downside from using Hollywood for programming is the executable is about 4MB, which is a little more than twice the size of the other players. On the other hand, it is able to take advantage of the Hollywood pluggins to support multiple formats and 4MB in the world of 2GB systems, isn't really an issue. RNOTunes has two features that make it stand out from the others. The first is the ability to display lyrics for the currently playing song. Just open the lyrics window and click the fetch button. The program will then search an online database and, if the lyrics are found, will display them in a window. The second unique feature is the ability to use the Last.fm scrobbler feature. As you play songs, info about the song is uploaded to your Last RM account for tracking.  RNOTunes supports MP3, FLAC, Ogg Vorbis, AAC, AIFF, WAV, Protracker, DigiBooster, SID, AHX, FastTracker II, ScreamTracker, OctaMED,  ProRunner, Oktalyzer, Impulse Tracker, Ultra Tracker, Ice Tracker, Liquid Tracker, Quadra Composer, and other formats.
   

RNOTunes runs well on the A1222 Plus and it's nice that the required plugins are included in the archive. I've moved the plugins to the libs Holleywood directory, so they aren't duplicated on my system. RNOTunes interfaced is adjustable from showing just a volume control, position gadget and player controls, to displaying album covers, song information, lyrics and more. It only uses ~3% of the CPU, which is the lowest of all these players. 

​SongPlayer v1.64

Picture
SongPlayer with playlist, Karaoke editor & display, which can be full screen.
SongPlayer was initially developed in 1994 for the 68k Amigas and supports OS4 as of version 1.64. I used to use it on my A3000 many years ago. It was quite an accomplished player in those days and still holds its own among the more recent OS4 audio players with some unique features. It is the only player that supports a karaoke display mode and editor for displaying lyrics with proper timing. I used it to create and play a karaoke file on the A1222 Plus and it works quite well.  In addition, there are two other features for controlling the sound output. First it has a stereo expand feature, that mimics stereo with mono files. If you turn it on with a stereo song it seems to provide some depth at the expense of some bass reproduction. The second unique feature, and the reason it is currently my default audio player on my A1222 Plus, is that it has bass and treble adjustments. More on this later.  SongPlayer  is an older player so does not support some of the newer audio file formats like AAC, FLAC or OGG. It does support IFF, AIFF, WAV, AU, MP2, and MP3. 

SongPlayer runs quite well and uses ~ 5% of the cpu, which is the second lowest of this group of players. Its interface uses MUI so it's nothing fancy but is functional.  It allows you to display song information but does not show album covers from ID3 tags but RNOInfo can be used for that. (See next item.) 

One Last Item.  RNOInfoScreen.

Picture
RNOInfoScreen showing song info, album picture and player controls.
This concludes my round up of audio players on A1222 Plus, but there is one last audio playing "add-on" that should be mentioned. That is RNOInfoScreen. This is not a song player but an add-on that optionally displays the album cover, artist, song title and album title for the currently playing song.  The information is taken form the ID3 tags in the song file if any exist, and if not, it can obtain this information from the internet automatically, if enabled.  In addition, it can display controls which allow you to play, pause, play next song and play previous song.​ In addition, it supports the Last.FM Scrobble feature by sending information about played songs, but it doesn't display statistics like RNOTunes can. RNOInfoScreen is a nice add-on and can be used with all the players included in this round up.  I encourage you to check it out.

​So, which player is best on the A1222 Plus?

As is often the case when this question is asked, the answer is, it depends. Each player has its strenghts and unique features, so insead of picking a best, I'll ouline the strenghts and in some cases the weakness of each player and let you decide.

AmigaAmp3 v3.4
Allows for the best cutomization of the sound due to it's 10 band equalizer.
Best looking interface and allows for custom skins. There many skins widly available.
Has built in support for the most popular formats and can use most TunNet plugins to play a large variety of formats, 
Unfortunately, it uses 70 to 80% (with equalizer enabled) of the CPU, so doesn't multitask well.
Good if you want the best sound and just want to play music and not do much else at the same time.

TuneNet v2.18
Included with the Enhancer package and works well.
Supports a huge number of formats via plugins.
Can be used to broadcast, although I didn't test that feature. 
Uses 8% CPU when playing music but jumps to 22% when using a skin or the amidock interface.
Best for finding and streaming stations form the internet.

DAPlayer v1.14
A competent all-around player which only uses ~8% of the CPU time.
Supports a variety of modern formats including CDAA, MIDI, and MOD files. 
Has ability to equalize volume of each song so they all play at the same volume.
Best if you have songs with varying volumes. 
Best for playing CDDA files from music CD's .

RNOTunes v1.1
A very nice player that uses the least amount of CPU time at only 3%. 
Supports a variety of formats via Hollywood plugins. 
Programed with Hollywood so it is about twice the size of other players. 
Best for use with Last.FM scobbler.
Best for searching the internet and displaying song lyrics.

SongPlayer v1.64
A nice simple player that uses little CPU time at ~5%.
Does not support currently popular file formats, with the exception of mp3.
Second best at allowing customization of sound with bass and treble controls.
Best for creating a Sudo stereo effect for mono files. 
Best for easy creation of Karaoke files and displaying timed lyrics in a window or on their own screen. 

So which do I use on my A1222 Plus?

Since I store all my music in mp3 files, I currently use SongPlayer as my default player when I just want to listen to music on my A1222 Plus.  This is due to the fact that it has bass and treble controls. I have a 10-watt amplifier and two 3" speakers built into the case of my A1222 Plus, so by tweaking the bass and treble setting I can get pretty good sound out of this setup. If the music is in a format that SongPlayer doesn't support, or I want to see lyrics of a song I'll use RNOTunes. For streaming from the internet, I'll use TuneNet.  If I had a CD drive, I'd use DAPlayer to play music CD's.  The bottom line is that each player has unique features that make them useful in different situations. The good news is that most of these players work quite well in the A1222 Plus. 

Feel free to leave comments about which player you use and why.  Next month I'll cover how I installed and 10-Watt amplifier and speakers inside my A1222 Plus case to create a truly portable system. If you made it this far, thanks for reading.
​

2 Comments

Using a Logitech K400 Plus Keyboard with the A1222 Plus

6/3/2024

3 Comments

 
Using a PC oriented keyboard, and especially, one with a touchpad, can present challenges when used on an Amiga. In this blog, I'll outline the challenges, and present my solutions to make this keyboard very usable with the A1222 Plus. Many of these tips apply to other keyboards with other models of computers running AmigaOS4.

Why the Logitech K400 Plus Keyboard?

As mentioned in earlier blogs, my goal in building this A1222 Plus was to create a system as portable as possible and be able to use it by just plugging in one power chord. To meet these goals, I needed a small wireless keyboard with a touchpad, so I don't have to haul around a mouse as well.  I also wanted one that has a "Menu" key and supports multimedia keys. More on this later.
​
After looking at reviews for multiple keyboards which fit this criterion, I settled on the Logitech K400 Plus keyboard.  Note that this is the "Plus" keyboard.  It has the multimedia keys, where the non "Plus" keyboard does not.
Picture
(Open in new page to see larger view.)
I've used Logitech wireless keyboards with various Amiga models over the years and have never had an issue with them. Since it meets all my criteria it seemed like the logical, safe choice. 

Challenges using a touchpad with AmigaOS4

I have never really liked using touchpads in place of a mouse. I have always found them difficult to perform operations where you have to hold down a mouse button and move the pointer at the same time. This becomes even more of a problem on the Amiga where you hold down the right mouse button and move the pointer to make a menu selection.  Holding the left mouse button down while moving window sliders, selecting and moving groups of icons can also be painful.   

Touchpad Workarounds

Picture
(Open in new page to see larger view.)
Picture
Fortunately, with a bit of experimenting, I've found a couple of ways to make the touchpad much more usable.  The first is provided by the keyboard itself and the other is by changing some settings in the GUI preference.
​
Keyboard Workaround: 
If you look closely at the keyboard, you will notice a yellow button with a picture of a mouse on it in the upper left-hand corner. Pressing this button is the equivalent to pressing the left mouse button. This makes it easy to move the pointer around with a right-hand finger on the touchpad while holding down the left mouse button with the left hand. The mouse button key and the touchpad being at opposite ends of the keyboard makes this a very comfortable and easy way to perform these actions. 


GUI Settings Workarounds:
Ok, that solves half the problem. Now what about using the right mouse button and touchpad for menu selections. Of course, many menu items have keyboard equivalents, but I rarely remember most of them and what about menu items that don't have keyboard equivalents. If only there was a way to not have to hold down the right mouse button to keep the menus displayed, while making a selection.  Well...it turns out there is.

In the Prefs drawer you will find the GUI preferences program.
Open the GUI preferences program and click on "Menus" in the "Subsystem" list.  Under the "Pull-Down Menus" and "Pop-up Menus" sections, enable the "Sticky panels" selections.
Picture
(Open in new page to see larger view.)
Now the menus will stay open by simply clicking the right mouse button and selections can be made using the touchpad without having to hold down the right mouse button. Much easier to select menu items.

While in the menu setting, I set the following setting as well. "Menu Type" to "Pointer position dependent", to enable context menus, and "Context menus open" to "Centered under pointer", to have the menu pop up with the mouse in the center of the menu. 
Another setting to help minimize required mouse movement is to set the requesters to appear at the current mouse pointer location.  This can be set in the GUI preferences program as shown below. Select the "Options" item from the "Subsystem" list and set the "System requester opening position" setting to "Under mouse pointer".  
Picture
(Open in new page to see larger view.)
The final thing I did to minimize mouse movements, and reduce clutter on my Workbench screen, is to have the parent windows close when I open a new directory window. This can be done from the "Workbench preferences" program. Under Options, select "Close parent automatically.
Picture
(Open in new page to see larger view.)
Now I hear you say, "but I have to use the menu to open the parent drawer if I want to go back to it.".  Well, yes, or you can use the solution I came up with and describe in the "How To Use Multimedia Keys" section below.

What About the "Amiga" keys?

Now we come to the age old problem of using a keyboard designed for a Windows PC with an Amiga.  How do I handle the special "Amiga" keys that aren't available on the keyboard?
​
Looking at the bottom row of keys on the Logitech K400 keyboard you will see, Ctrl, FN, Windows, alt, space, alt, ctrl, home, pg up/down, and end keys.  Oh no, there is no menu key! Usually, the Windows key will function as the Left Amiga key and the Menu key can be mapped as the Right Amiga key. What to do?   Fear not, there is a workaround.  By default the Left and Right Alt keys will function as the Left and Right Amiga keys respectively.  That's all well and good, but now we don't have Left and Right Alt keys, and unfortunately, as all Amiga users know, from time to time we have to use the CTRL+LALT+RALT keys to perform a hard reset. 
Picture
(Open in new page to see larger view.)
So, here is my solution to this dilemma. The first thing I did was start the Input preferences program and make sure "Swap Alt/Amiga keys" is not selected. (It's selected by default in the A1222 Plus OS4 image.) 
Picture
(Open in new page to see larger view.)
Now the Alt keys work as Left and Right Alt keys, but what about the Amiga Keys?  Well, after switching the Alt keys, the Windows key will function as the Left Amiga key.  That's all well and good but what about the Right Amiga key? It's needed to performing cut/paste and menu selections with the keyboard. There is a solution, and while it's a bit more complicated to setup, and takes a little getting used to, it works well.

On OS4Depot, you will find Daniel Westerberg's program called "allkeys.lha".  This program allows you to map keys, including multimedia keys, to act like other keys, execute Arexx scripts, or to start programs.  More on this later, but for now we are interested in another program that is also contained in this archive.  After unpacking the archive, you will find a directory called "Tools" in the AllKeys directory.  In this directory is a program called, "MapMenu". This program will change the "Menu" key to act as the Right Amiga key. But, "we don't have a menu key", I hear you say. Well, not so fast. It turns out that the "F4" key also functions as a "Menu" key. In fact, all the function keys on the K400 keyboard perform the multimedia functions by default. You have to hold down the "FN" key then the desired function key for function key use. Ok, back to making the "Menu" key act as the "Right Amiga" key.  Place the "MapMenu" program where ever you like.  I moved it to a directory called "MyC" on my system, where I put cli commands that didn't come with the OS by default.  Then add the line shown below to the "S:User-Startup" file. 
Picture
Reboot and now your "Menu/F4" key will operate as the "Left Amiga" key. It's not as convenient as having it at the bottom of the keyboard, but I'm finding the more I use it the more I get used to it and it actually works out well.

How To Use Multimedia Keys

The final item to make the keyboard more useful, is to assign those multimedia keys to do something useful. As mentioned above, we can use Daniel Westerberg's "AllKeys" program from OS4Depot to do this. I have used this program on my X1000 for years and I find it really handy. So far, I have mapped most of the top row keys on the Logitech keyboard. I'll show you what I have mapped so far, so you can get an idea of how to use the program and what capabilities it has. 

After unarchiving AllKeys, I suggest moving it to the "Sys:Utilities/Commodities" directory, since it is a commodity. I personally create a "MyCommodities" directory in the Commodities directory, so I can keep track of ones I've added vs. ones that come standard with AmigaOS4. Anyway, once that is done, start the program. The following Window will appear. (Note the list will empty. The picture contains my assignments.)
Picture
(Open in new page to see larger view.)
This window will list the key assignments and the functions they will perform once they are setup. As you can see, I have setup a few keys. Some that just get translated to perform a different keys function, some that execute an AREXX command and some that start a program running. 

This program is much easier to use than it used to be, but it can still be a little tricky, so I'll provide an example of how to setup a key to execute the "Open Parent Window" Workbench AREXX command. The first thing to do is decide which key on the keyboard I want to use to start the calculator. I'll assign the "Back Arrow / F1" key to send the command.  Since we already have AllKeys running, click on the Add button which will open a second window as shown below.  This window will record key presses and display the keycode for the given keys. Unless disabled by the buttons, it will show both the down stroke and upstroke codes.  After pressing the "Back Arrow / F1" key the window will contain the following entries. 
Picture
(Open in new page to see larger view.)
I clicked to highlight the key down key code, then click, "Use Code".
The recording window will close and an entry containing the keycode will be made in the main window. Then I filled in the action I want the key to perform by double clicking in the "ARexx Port" field and typing in "WORKBENCH" as the port name. Next I select the "ARexx Command" field and entered the Arexx command to execute.  In this case, "MENU INVOKE WINDOW.OPENPARENT". Then I clicked "Save". Now the active windows parent drawer window will be opened when the "Back Arrow / F1" key is pressed.  I selected the "Eat" button, so the keycode will not get passed on. If "Eat" is not selected, the keycode will get passed on and used as it normally would by other applications.  

If you just wanted to Translate a key to act as another key, click the "Translate" button and the recorder window will open again.  Once again, press the key you would like the original key to be translated too, highlight, and click "USE".  The new keycode will then be placed in the Translated field in the main window. Once saved the first chosen key will send the translated code of the second key when pressed. The other option is to follow this process and add the full path to the command you want to execute in the "Command" field.
 

My Key Assignments

To date I have assigned the following keys on my A1222 Plus.
Picture
(Open in new page to see larger view.)

There you have it ​​

There it is.  All the trick and tips I have used to make the Logitech K400 Plus very usable with my A1222 Plus system. So far this has been a great little keyboard which fits my needs very well. I've even come to like using the touchpad, instead of having to haul around a mouse and make room to use it.  

Most of these tips can be used with many keyboards. I hope you find something useful here, even if you aren't using a Logitech K400 Plus keyboard.  Let me know in the comments. If you have other ideas which make using multimedia or touchpad keyboards easier I'd love to hear about it.  

What's Next

Next entry I'll finally get into using programs on my A1222 Plus.  I'll start with a review of how well various music playing programs work on the A1222 Plus. After that I'll take a quick detour back to the hardware side and describe how I fit a 10 Watt per channel stereo amplifier and two speakers inside my little case to make it a truly, self-contained, portable system.

3 Comments

A1222Plus up and running. What now?

5/8/2024

2 Comments


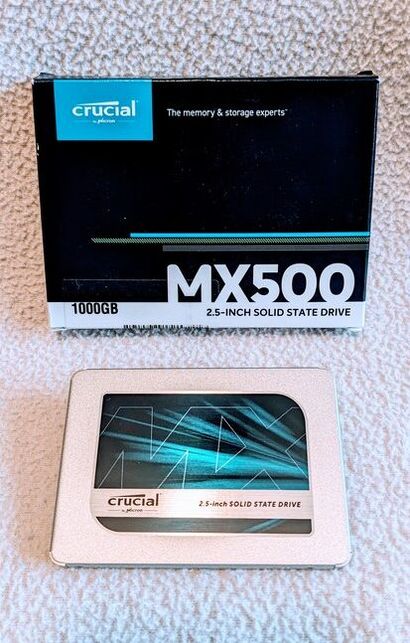
Partitioning the SSD Drive

So, the hardware is installed, and I've successfully booted from the Emergency USB recovery stick.  What now?  Partitioning the SSD drive of course. Now this may sound like a simple task and, in general, it is. The most difficult part is deciding how many partitions, what they will be used for, and how big each one should be. 

​After 38 years of using various Amiga systems, I've have settled on an arrangement that works well for me. Your mileage may vary. I find this makes it easy to find things, makes it easier to perform more frequent backups of critical items and allows for flexibility if I want to resize or replace a partition that might go bad.  Fortunately, I have rarely had a partition on a hard drive go bad, but you never know.

​Get to it Already

OK. First I boot from the SSD drive, went to the "SYS:System" drawer, and started "Media Toolbox". Then I selected the "p1022sata.device" and clicked "start".
Picture
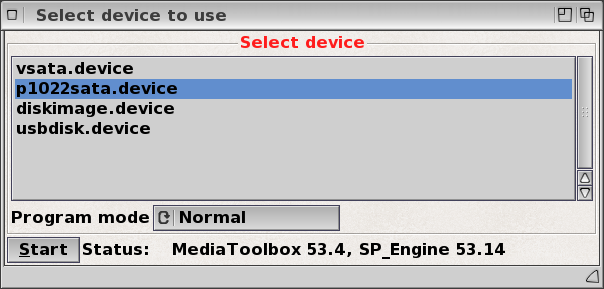
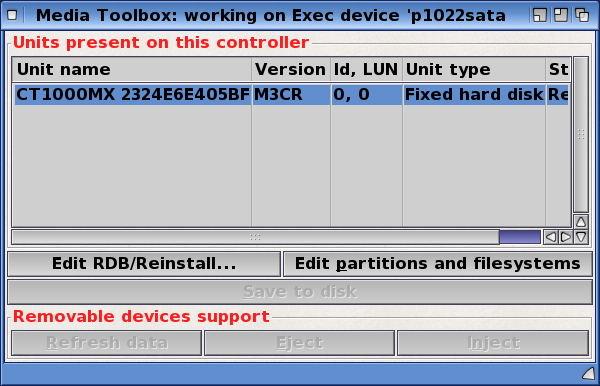
I then select the SSD drive from the units listed.  If the drive hasn't been installed, click the "install" button then click "OK" at the next window. In my case, I had already installed the drive, so I clicked the "Edit partitions and filesystems" button.
Picture
As you see below, I have created 6 different partitions using the, new,  recommended, NGF\01 filesystem. I'll explain why I set it up this way later.

To set up each partition, I selected "Add partition". The "partition editing" bar turns green. I then adjusted the bar to set the size of the partition, gave the partition a "Name", and enabled "Automount".  For the System partition, I also enabled "Bootable" and set the "Boot priority" to zero.  ​
Picture
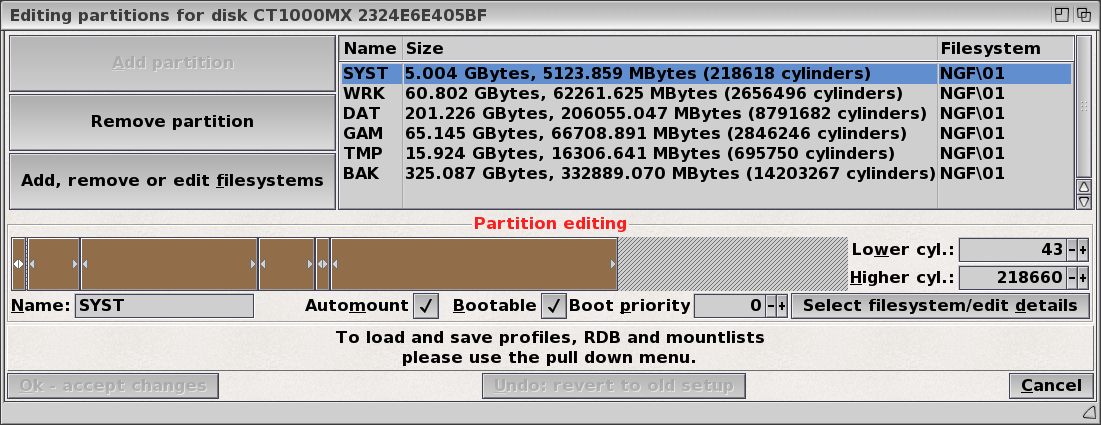
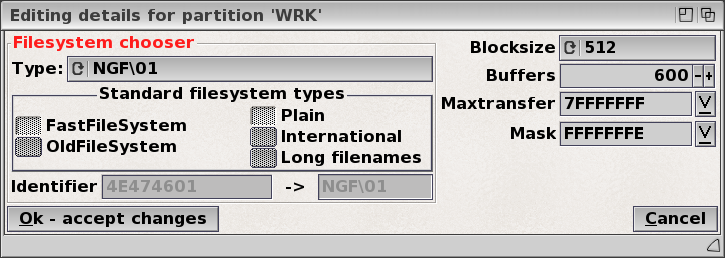
For each partition, I clicked on "Select filesystem/edit details" button to set the file system and other details. For "Type" I selected "NGF\01" as recommended by the A1222 Plus quick Start Guide. I also set the "Blocksize" to 512 as recommended. My understanding is that this will give the fastest read/write speeds. I left all other setting to defaults, then clicked "OK - accept charges". 
Picture
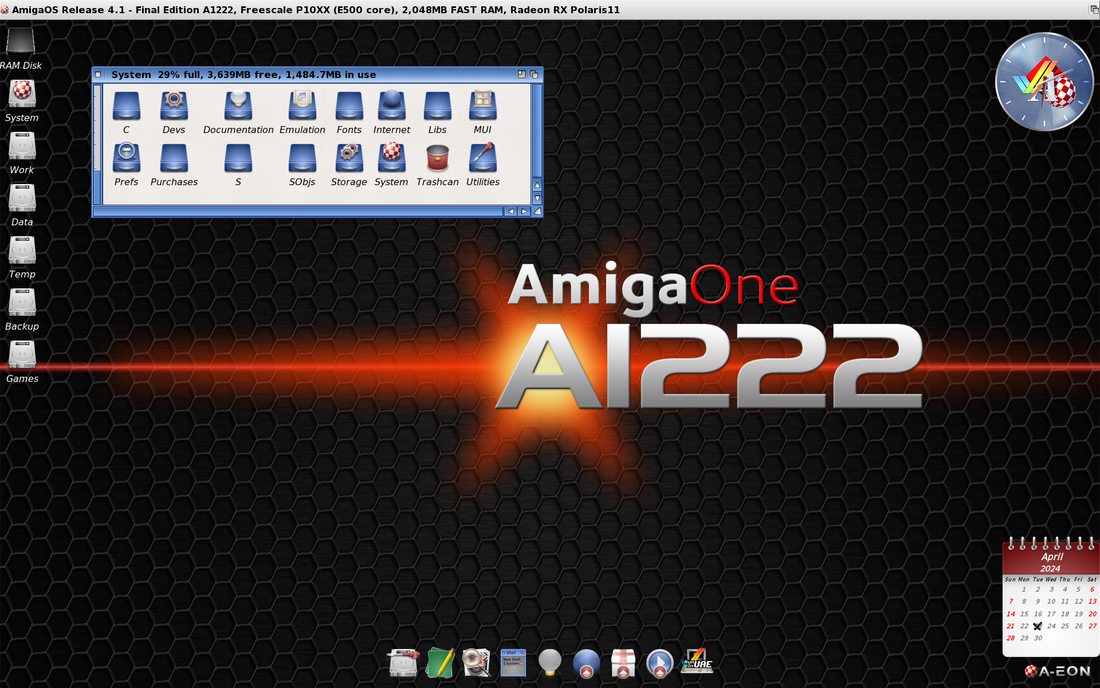
​After setting up all the partitions, I clicked "OK - accept changes" on the "Editing partitions..." window. I was warned about losing any existing data, then asked about rebooting the system to activate the partitions. I accepted these dialogs and rebooted the system.  Once rebooted, the partitions show up on the "Workbench Screen".  See screen grab below.

About My Partitions

So, why did I partition the hard drive the way I did?
As mentioned earlier, I created 6 separate partitions to make backup easier and to make things easy to locate. The downside of all these partitions is it clutters the Workbench, but it is possible to disable the showing of the icons on the Workbench using the "Workbench" utility found in the "SYS:Prefs" drawer. I chose to disable the "Backup" and sometimes the "Temp" partitions.

I setup the following partitions:

System (SYST - 5GB):
This is where I installed the AmigaOS4 operating system and all its components. The A1222 Plus quick start guide recommends it be at least 1GB. I made mine 5GB as I have a 1TB hard drive and want to make sure I never run out of space for enhancer and other third-party libraries.  Currently I'm using 1.4GB on my x1000 that I have had for around 10 years or more. I'd suggest a minimum of 3GB would be safe. This partition is relatively small and is quick to backup. This makes it easy to backup before I make any changes to it that have potential to do harm.

Work (WRK - 60GB):
This is where I put all the software application I install. I have created drawers covering general categories, like business, internet, audio, graphics, etc. and install related software into these directories. Note that I don't usually store " data" for the applications in these drawers.  I store the data on the Data partition. I usually back this up after installing new software, or every one to two weeks.

Data (DAT - 200GB):
This is where I store almost all the data for the applications.It includes drawers to store SimpleMail Data, Pictures, Music, Videos, Documents, etc. In addition I have a drawer named "Downloads" where I store the latest archives of all the download software from OS4Depot and other companies. This allows me to have all the important data located in one partition for easy backup and archiving.

Games (GAM - 60GB):
This is where I install all games and associated data files.  I only back this up once every three months or so.

Temp (TMP - 15GB):
This is where I store files that are intended to only be there temporarily. It might include things I download but won't get around to looking at until later. It is also where I created temporary locations for beta testing my own and others software. This partition doesn't get backed up very often.

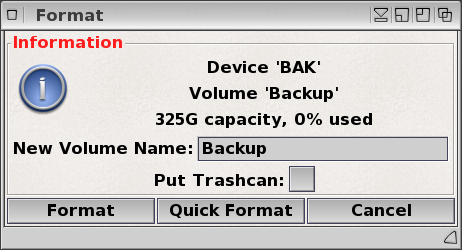
Backup (BAK - 325GB):
This is where I regularly backup all the individual partitions.  About once every 6 months or so I'll back this up to an external USB SSD Drive. It's large enough to be certain I will have room to back up all my partitions, except this one of course.  

The rest of the drive, about 256GB is left un-partitioned.  This space is large enough and reserved in case I need to replace or enlarge one of the other partitions. 

​There it is with all the gory details. On my x1000 I have a few more partitions. These include a Video partition for video editing, a Develop partition for developing software and an Emergency Boot partition, just in case. The Video and Emergency Boot partition are generally hidden.

Partitions Created - What's Next?

Now it's time to format the partitions. After the system reboots, icons for all the newly created partitions are displayed on the Workbench Screen. One by one I right clicked on the icons and selected "Format..." from the drop-down menu. I gave each one a volume name and unchecked "Put Trashcan" selection.  Once setup, I selected "Quick Format". Note: Only use "Quick Format", especially on SSD drives. 
Picture
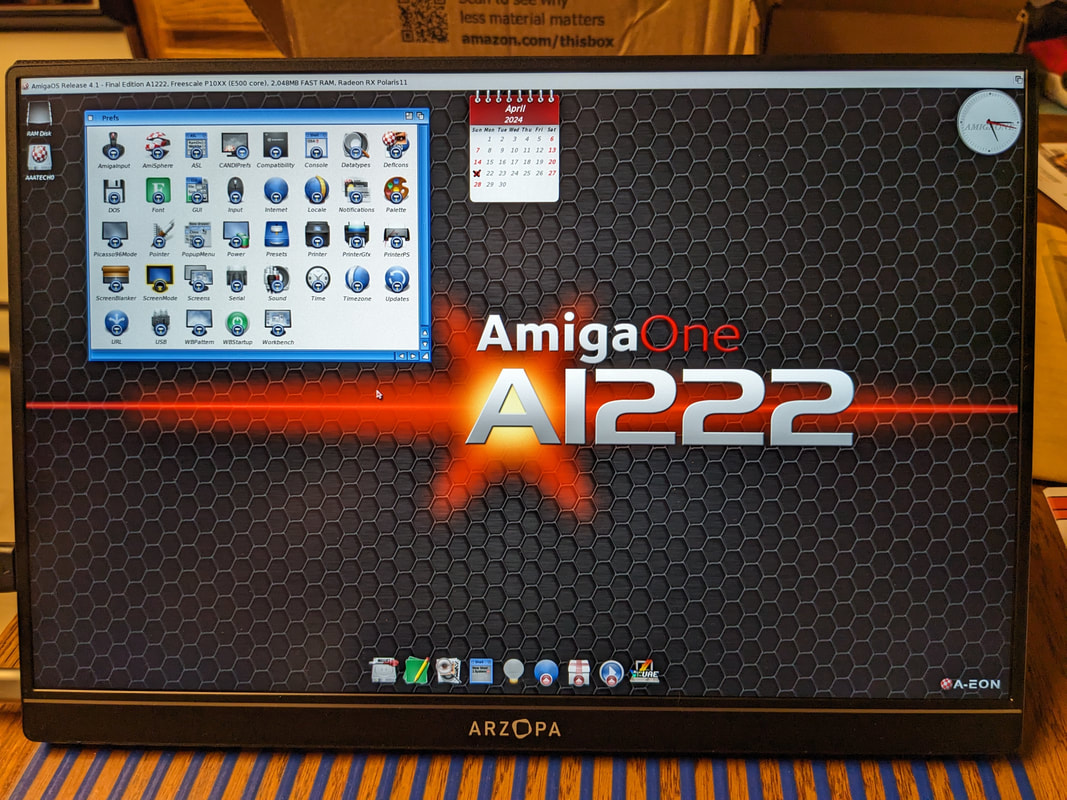
Below you see a screenshot of the Workbench screen with all partitions showing. Looks clean to me. I like the default background of the A1222 Plus.
Picture
That's it for now.  Next entry I'll talk about using the Logitech K400 PLUS wireless keyboard with touchpad. I've made several tweaks to the system to make it usable with the A1222 Plus.

2 Comments

AmigaOne A1222 Plus Arrived Today

4/21/2024

8 Comments

 
Picture
Back of the box the A1222+ is packaged in shows a nice picture of the motherboard and list the specifications.

Picture
Included in the box is the A1222+ motherboard, quick start users guide, backplane and OS4 Emergency boot USB drive.


Build Components Used

Picture
Crucial MX500 1TB SSD Drive
Picture
IOGEAR Ethernet-2-WiFi adapter to support wireless connections to internet. Powered by Power Strip.
Picture
Logitech K400 Plus Keyboard with Media keys and touchpad.
Picture
ARZOPA GAMUT MINI 2K 13.3" Portable Monitor powered by USB-C port of power strip.
Picture
Yeston Radeon RX550 low profile graphics card.
Picture
HEZI 45Watt Power Strip with 4 AC outlets, 2 USB-C and 1 USB-A outputs for powering devices.
Picture
Antech ISK300-150 Mini-ITX case. 150W power supply. 80mm tri-speed fan. 3.8"(H) x 8.7"(W) x 12.9"(D). 2 USB, 1 eSATA, Aud In/Out ports. 1 External 5.25" slim drive bay. 2 Internal 2.5" drive bays.
Picture
When monitor case is closed the monitors magnetic case sticks to Antech case.

The Build

Picture
Motherboard with 8G RAM, Graphics card installed. Case power supply, Case LED's and switches connected.
Picture
Drive bay containing SSD drive installed. Still need a SATA cable and USB2 motherboard to USB 3 cable adapter to connect front USB ports.

Fully Assembled

Picture
Fully assembled rear view. Audio Out connected to an external USB powered speaker. LAN connected to a wireless converter. HDMI connected to a portable display.
Picture
Fully assembled. Still need to buy shorter exterior cables to clean  up the look. The goal of being able to plug in one plug to run the whole system has been reached. Looks like I should be able to fit an internal speaker in the spot for a second fan.  

Picture
Powered and it's alive!   Still booting from USB Emergency Boot memory stick, which was supplied with the motherboard.  Next step is to install on the hard drive.

First Boot Videos

A1222 Plus First Boot Download. (1080p / 13MB)
Play on Google Drive (1080p)
A1222 Plus First Boot Download (480p / 14MB)
Play on Google Drive (480p)
8 Comments

    Ktadd

    Amiga owner since 1985. Classic Amiga's: A500 A1000, A3000.
    NG Amiga's:
    ​UA1, X1000, A1222+

    Archives

    December 2024
    August 2024
    July 2024
    June 2024
    May 2024
    April 2024

    Categories

    All

    RSS Feed

Powered by Create your own unique website with customizable templates.